Category Archives: Living Room

How to Score Super-Cheap Upholstery Fabric

This:

Plus this:

Equals durable, custom-colored upholstery fabric for less than five dollars per yard. Can’t beat that deal with a stick.

Dying dropcloths, or any fabric, is super easy. Just follow the package directions. Here’s my much less concise version:

  1. Fill your washing machine with hot water
  2. Add dye, let it swish around in there for a while to mix
  3. Add your wet, unfolded fabric to the mix (after repeating this process several times, I started skipping the pre-wetting altogether and never looked back)
  4. Reset the machine to the beginning of the wash cycle and let it swish around for a while
  5. Stop the machine before it starts spinning/draining and check to see how your fabric is looking. If you’re not sure it’d dark enough let it sit in the water a while longer. Set a timer so you don’t forget it.
  6. Let the machine drain and make sure the rinse cycle is set to cold. Check as it’s rinsing to see if there’s a lot of dye in the water. You may need to run in through the rinse cycle again until the water is clear.
  7. Wash in hot water with detergent
  8. Pop your fabric in the dryer and run an empty load through the washing machine with hot water and detergent, and maybe even bleach. I was out of bleach so I didn’t use any and it turned out okay.

Lucky for me I’ve got an old-school top-loading machine. I yearn for a sleek and efficient front-loader but in this case I was grateful for the ability to pull the fabric out and check it before letting all the dye go down the drain.

But alas, getting the perfect shade was not as easy as I had originally planned. I was going for a nice, deep charcoal gray. I figured it wouldn’t look too matchy-matchy with my oatmeal-colored sofa and would maybe do a good job of hiding stains and cat hair. The only grayish options at Hobby Lobby were Pearl Gray, which looked a little pale to me, and black. I opted for the black, figuring I’d only use half the bottle and end up with gray. Sounds great, right? Not so much. This is what I ended up with:

Lavender! Lovely plant, terrible upholstery color. Turns out the black had a purple base, so weakening it gave me pastel purple instead of the moody gray I was going for. Total bummer. I thought and thought about what to do next. I really wanted my gray to have more of a blue undertone. In a stroke of genius I got out my acrylic paints and whipped up a shade of lavender, then added some navy blue to see what would happen. Voila! A lovely greige. Off to Hobby Lobby I went for some navy blue dye, and after repeating the steps above with lavender fabric + blue dye I had this…

Darker purple dropcloths. Terrible. I was starting to worry I’d have to toss these dropcloths and start over with fresh ones, but giving up isn’t really my style so I persevered. I did some googling, consulted Rit’s own guide for creating custom colors (which I should have done in the first place) and decided, prepare yourselves people, to try dying them orange.

One package of sunshine orange dye later I had this:

I’m not gonna act like there’s not a tiny bit of lavender in there, because there totally is. But the orange cancelled out most of the purple and while it’s not my dream gray, I’m totally okay with it. I even think it’s a nice, warm contrast to the cooler, more greeny blueish gray on the wall behind it. And now that I’ve got that mauve fabric outta there, I’m loving it even more. Here’s a sneak peak midway through the reupholstery process, to give you an idea of how the fabric looks in action:

Lookin good, huh? Now here’s the bad news: I really underestimated how much fabric I would need. Poor judgement combined with significant shrinkage from all that washing and drying means that my three 5×7 dropcloths (which each shrunk to about 4×4) were only enough to cover one chair. Now I’ve gotta pick up some more dropcloths and try to retrace my footsteps in creating an identical (or very close) shade of gray.

So, on the agenda for after work today:

  • go to Lowe’s for more dropcloths and more staples (I’m out)
  • grab some more dye from Hobby Lobby
  • dye my new dropcloths, try to recreate my genius
  • finish stapling up chair #1

And the rest of this week:

  • teach myself how to sew a box cushion for chair #1
  • cut fabric for, reupholster, and sew box cushion for chair #2

I’m exhausted just thinking about it. I’m so glad I tore chair #2 apart before I could talk myself out of it, because I would totally just leave it mauve for another six months or so at this point.

DIY Upholstery, Part 1: Demo

I spent the labor day weekend finally tackling the secondhand wing chairs in my living room.

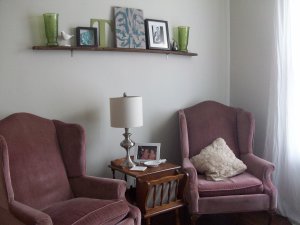
I got these chairs for $50 from craigslist right before we moved into this house with grand plans to sew custom slipcovers. A shameful 18 months or so later the mauve velvet is still proudly on display and I’m ready to do something about it.

I’m still a total newbie to this sort of thing, but I think that reupholstery is actually easier than making a custom slipcover. I’m not so great at spatial reasoning, so I really struggle to sew anything more complex in its 3D-ness than a throw pillow. Upholstery is a little easier since you can use the old fabric as a pattern for the new and then just tack it all on there.

That said, let me just tell you that this is hands down the hardest project I’ve ever undertaken. After three days of tearing those chairs apart and putting them back together my body is sore, my brain is frazzled, and, here’s the worst part, I’M STILL NOT DONE! Can you believe it? To be fair, it’s not like I spent every moment working on it. I mean, LSU did play their first football game this weekend. But I can say with honesty that I’ve put at least twenty hours into this project so far and I’ve probably got another 5-10 hours to go. It’s taking waaaaaaaay longer than I expected it to.

This will not be a detailed step-by-step tutorial because I still have no idea what I’m doing. I started out by reading this tutorial, which I found really helpful. I grabbed a small flathead screwdriver, a pair of pliers, and a bowl for all those staples. Armed with my tools and a Kardashians marathon, I flipped chair #1 over and got down to business.

I was feeling so full of hope and determination when I removed that first piece of fabric covering the bottom. Oh, how my spirit would be crushed in the hours to come.

Pretty much everything is stapled to the bottom of the chair. I got started prying out one staple at a time.

So, so many layers of staples. I removed staples all around just to find that the only thing I’d freed was the piping. Ugh. Eventually I got everything detached from the bottom and started working on what appeared to be the next layer, the back of the chair.

The sides were attached with this strip of nails. I pried it out with the screwdriver, then gently pulled it off of the fabric. I set it aside to re-use with the new fabric.

The top of the back piece was attached with this grippy strip thing. Kinda crazy. As with the strip of nails, I tried to keep both it and the fabric in reasonable condition so I could use it when I put the chair back together. Apparently by the time I got to this step I was so worn out from all the staples I’d removed thus far that I couldn’t even snap a picture without my finger blocking the lens.

The grippy strip was attached to the chair with more staples. Ugh.

Next was the part under the arm and wing. The original upholsterer had applied the staples through a thin piece of wood to give a nice, crisp line at the top. Clever.

Next were the wings, arms, and what I’ve recently learned are referred to as the “deck” and “nose” (the pieces under the cushion and at the front of the chair, respectively). And I guess I was in the zone because I didn’t take any more pictures, save for this one I snapped on my iphone. The Animal Entourage was protesting my devotion to the chair.

After a whole day of working off and on, but mostly on, I had ONE chair deconstructed.

Note that I kept the original batting and foam. I saved everything except for the staples and fabric to be reused. Waste not want not! BTW, I used a sharpie to label each piece of fabric as I removed it, writing down where it went, which way was up, and instructions to attach the new stuff (ex: left side, attach after arms, before wings). I thought that might help in putting humpty dumpty back together again.

There was nothing intellectually challenging about this part of the project. It was just very tedious, frustrating, and physically grueling. And also disgusting. The inside of that chair was full of dirt, crumbs, and junk. I’m so glad there aren’t any little kids in this house because I was stepping all over rogue staples and unidentified particles by the time this chair was naked.

So that was Saturday. I spent Sunday tearing apart the other chair. I knew that if I reupholstered one chair completely it would be really hard to get motivated to do it all over again on the other one so I figured it best to get both of them torn apart from the get go. Spoiler alert: it’s 8pm Monday as of this writing and chair #1 is about 75% reupholstered. So much for getting this project done before returning to work on Tuesday!

Working with Inherited Furniture

Some inherited furniture is awesome.

Some is less obviously so.

I inherited these end tables from the same grandparents’ that the bedroom set belonged to. They were in storage when Katrina hit and lucky to have missed the water by a few inches. Even though they’re not really my style, especially the first one, I’m at a loss for what to do. I’m hesitant to paint, although not completely opposed to it. In all likelihood these tables will probably stay where they are for now and I’ll hold off on making any changes. After I reupholster those wing chairs in gray canvas maybe the table won’t bother me so much?

I think when you’ve got a piece like this-one with sentimental value that doesn’t quite float your boat aesthetically- it’s best to live with it as is for as long as you can possibly stand it. Better to wait until you feel confident than make a change and regret it, right?

Come on in, Have a Seat!

Whoever designed our little bungalow decided that any house with such a generous porch didn’t need much of an entryway on the inside. I’ve created a hall of sorts using the back line of the sofa, but the front door essentially opens right into the living room. I brought in a vintage piano bench and an inexpensive hook rail a while ago to add some storage and a little pizzazz.

Everything looked kinda dinky, though. The bench is a little too high to sit on comfortably and it’s so light that it moves really easily (awesome if it’s used as a piano bench, not awesome if you just wanna plop down for a second to put your shoes on). I hardly ever even used the storage area under the seat because everytime I lifted the lid the whole bench would move away from the wall, scraping my floors and threatening to topple over. Plus the whole operation is too narrow for the space.

So the other day I finally used a gift card I’ve had since my birthday in April and got this storage bench that I’ve been lusting after (from Target).

It was a little bit more expensive in the store (about $85 after tax), but I figured I probably would’ve have spent close to that after shipping had I bought it online. Plus I got the instant gratification of bringing it home that day. Side note: I couldn’t find it in my local Target even though the website said it was available, so I asked an employee and he got one for me from the back. Thanks Mr. Target Man! It never hurts to ask!

I added a yellow pillow I already had to give it a little “oomph.”

I like that it’s a lot more substantial than the piano bench and is definitely more functional for the space. It’s soooo comfy to sit on and everything from Nick’s tennis racket to my extra purses fits inside.

I moved a magazine basket I already had over here to corral catalogs and magazines for my perusing pleasure. Since these things both come in the mail and are often grabbed by me on my way to sit on the porch this is a great spot to store them.

I’m kind of thinking of adding an umbrella stand or a small basket for shoes on the other side, but I’m just not sure. I don’t want things to look too cluttered and in real life our wet shoes or umbrellas are usually left on the porch. It would be a cute spot for a houseplant if I wasn’t on a gardening strike. No more plants until I can keep the ones I’ve got alive.

Next step: replace that hook rail with a DIY solution that takes full advantage of the space. I’m on a hunt now for inexpensive double hooks. This, from Ikea, is the best deal that I’ve found so far, but I’m still searching.

P.S. Did I imagine it, or did Ikea used to sell a little hanging basket thingie that was perfect for gloves and dog leashes and whatnot in the entryway? Sorta like this but more basket like?

Vintage Quilt

Remember my burning desire for a new quilt? Well, I put Etsy’s search function to work, narrowing it down to vintage quilts under $50, and found this lovely lady (from etsy seller estatehound):

Sold. Can you believe that price? Even after shipping it was under $30. That’s way cheaper than even what I could have made myself. And yesterday, it arrived.

It’s exactly what I wanted. The colors are lovely, it’s a perfect fit for the couch, and it’s definitely not too precious to get clawed up or covered in cat hair. I knew that if I spent a lot of time quilting something myself I’d freak out the first time it got a rip or tear, but this one’s already sporting an authentic lived-in look in several areas.

Nick’s comment was, “It looks like it’s been here a while,” which I took as a compliment. One of my goals in decorating is to create a layered look that feels like it’s been put together over time (as opposed to ordered all at once with a few clicks). This blanket, so soft and worn, brings a fun, slightly kitschy vibe to my classic sofa. It looks like something I inherited, only I didn’t. I love to think about where it might have come from, who made it and why, and what memories it might hold for someone who recognized it.

I also love that it’s narrow enough to drape over the back of the sofa without folding in half, making the view especially nice from the back of the room and ensuring that even the most rambunctious of kitties won’t move it around too much (the old quilt seemed like it was constantly falling down).

Sheila’s a fan. I hope that this quilt gets to live a long and fulfilling second life with us. This isn’t the first time I’ve found exactly what I was looking for on Etsy. I got a small vintage tablecloth and a Degas print before I started blogging, and just in the past few months have gotten my peacock print and mother of pearl buttons. Shopping on Etsy is like heading out to a giant, well-priced arts and antiques market combined with the power of the internet to search and pinpoint exactly what you want. I may have been able to snag this quilt for less than $30 if I spotted it at a yard or estate sale, but it would have taken who knows how long for me to find it on my own. Etsy allows me to search through what all these wonderful small business owners have already found. Etsy is an amazing resource for decorating a space inexpensively, so if you’re looking for handmade or vintage items to add a little character to your space without dropping a bunch of cash you should definitely check it out.

So Poufy it Hurts

What I meant to say is that it’s so awesome I can’t even help myself. I just die. In less than two hours and for absolutely zero cash, I made my very own pouf:

It’s the perfect perch for extra guests and soooo comfy for me to prop my feet on after a long day of being awesome.

I used this pattern and tutorial from Better Homes and Gardens, but modified it to suit my fast and loose crafting sensibilities.

I started by harvesting canvas drop cloth material from the overhang on my slipcovered sofa. All that extra fabric hanging around has been kinda bugging me for months anyway, and now all I have to do is hem the cut edges the next time I take it off to wash.

Guess who the new camera hog in our house is? Juliet is even worse than Pistachio about wanting to be all up in my business. Lucky for her she’s so adorable.

Now that I had my free fabric, I used the pattern to cut out 8 matching pieces to construct the pouf.

I probably should have taken more pictures to explain the sewing process, but I was so “in the zone” and blown away by how easy it was that I just snapped a picture after each step. Since dropcloth material is so sturdy, I skipped BHG’s recommendation to layer muslin with the upholstery material. This made for half the cutting and kept sewing pretty simple. Working two pieces at a time, I stacked two pieces on top of each other and sewed them together all along one side. This gave me four pieces that were kinda shaped like orange wedges.

Then, I took two of those pieces and layered them inside of one another, making sure that the seams were all facing the inside of the sandwich, and sewed them together all the way down one side. I repeated with the other pair, yielding two halves of a sphere.

Turns out the only picture I took of my half-spheres was Nick wearing one as a hat. You get the idea.

With my two halves ready to go, I sandwiched them together (with seams all on the inside) and sewed them together all around, leaving a big honkin’ hole for me to get the stuffing in. I was especially careful around the point where all the wedges met to make sure that everything was all closed up. This was the only time that I wished I’d followed the tutorial’s instructions to iron all of my seams open. I was dealing with kind of a lot of material and it was hard to see what was what, but I made it through.

With my pouf shell ready to go, I gathered my stuffing materials-two fiberfill Euro pillows that I didn’t want anymore, two down-stuffed pillows that had seen better days, and a bunch of fabric scraps that were either too small or too weird for me to do anything with.

I opened up the pillows and got down to business. My basic strategy was to use the fabric scraps as the core of the pouf, with feathers adding a cushiony middle layer and fiberfill giving a soft outer crust.

I just started stuffing, and stuffing, and stuffing.

Things were looking pretty good after one pillow each of fiberfill and down (photo below), but when I gave it a test sit I fell over. A sure sign that I needed to firm things up a bit.

After using every last bit of stuffing I’d gathered (minus the feathers that ended up all over me and the floor), I declared it done.

A test sit confirmed that this pouf was destined for greatness, so I brought it into the living room and sewed up the opening by hand while catching the end of the Women’s World Cup final.

I flipped it over so that ugly hand-seam was on the bottom and spent the rest of the day reveling in its wonder.

It’s my new favorite thing. And word on the street is that I’m knitting an awesome cover for it, but you know how I am about projects that can’t be completed in one sitting. I’m really excited about the thick, rope-like yarn that I’m using, but I’ll be shocked if the dang thing ever gets finished. What’s great about this project is that it really was so much easier than I thought it would be. The fact that I skipped the octagon top and bottom pieces and decorative stitching recommended by the tutorial went a long way to keeping things simple. If you’re a details person, though, you could probably add those elements without a lot of drama. I’m all for decor that’s casual and not too fussy, so I don’t mind the rough seams a bit.

The canvas dropcloth material is really inexpensive and durable, but if you’ve got kids or are spastic yourself and are worried about stains showing on the light fabric, I think it wouldn’t be too hard to make a slipcover for it using the same pattern and snaps or velcro to close it up on the underside. Also, you could use Rit Dye to change the color to better suit your space or to hide dirt and stains a little better. Just dye the pouf shell in the washing machine before stuffing it and people will think you spent a lot of money on some beautifully dyed linen.

This project has been brewing in my mind for some time and I’m really glad that I finally did it. It really is such an awesome thing to have in the living room. So simple and comfortable. I don’t know how I ever lived without it.

DIY Patterned Coasters

I mentioned on Friday that one of my goals for the weekend was to make my own coasters, and, good news, I actually did it!

This project has been brewing in my head for over a year, so I already had the supplies on hand. Here’s what you’ll need to get ‘er done yourself:

  • 4×4 inch white ceramic tiles (about $1 each at home improvement stores)
  • Some felt or cork
  • Scrapbook paper
  • Decoupage medium

Way back before I had a blog motivating me to actually finish what I started, I got going on this project and got as far as cutting and gluing squares of felt onto the back of each tile. Those boh-ring white tiles served as coasters for the past year or so, but they never really did it for me. Plus, the super-slick surface of the tile occasionally formed a seal with whatever condensing container sat atop it, creating a recipe for disaster when you picked up your cup and the coaster was still attached. Every time this happened to me I would inevitably over-correct and spill my drink everywhere.

So I finally got down to business taking those coasters from “tile aisle” to “super style.” I started by tracing my tiles onto pretty patterned scrapbook paper left over from another project (my punched paper garland), then I cut each square out and tested its fit on the tile, giving a trim and a shave here and there as needed.

Then, I used a foam brush to coat the surface of the tile with a thin layer of decoupage medium.


I smoothed my paper square onto the tile, then applied another layer of decoupage on top, and I was done!


Let it dry for 20 minutes and you’re in business. I read somewhere online, though, that it’s best to let the decoupage cure for a few days before putting a drink on it, so I’m erring on the side of caution and just looking at them adoringly for now.


I cut one square a smidge small and didn’t have enough paper to make another full square, so I decided to bring in some other paper that I only had a small bit of and create a patchwork look, layering a few different pieces of paper to cover the entire area. I went ahead and used the same strategy on a fifth tile just so it wouldn’t be all alone in its patchworkiness.
I’m excited about the little pop of color these lovelies will add in the living room, and I’m hoping that they’ll be textured enough to avoid the condensation-vacuum effect I had going with the plain tiles. I’m not really obsessive about using coasters, especially since we have a glass-top coffee table that’s easy to wipe down, but two of the end tables in our living room are solid wood and belonged to my grandparents, and one of them just happens to be my favorite spot to set down a drink. Every time I set a glass on the bare wood I imagine my Nanny cringing.


She kept it ring-free for a loooooong time. Who am I to mess that up?

I want a Quilt

You may remember from previous posts about our living room that I like to keep a quilt draped over the back of the sofa, both to protect the awkward-to-vacuum back cushions from cat hair (it’s one of Sheila’s favorite spots) and to add some visual interest.

Sadly, my quilt had an unfortunate incident with a pink rug in the wash and is now dyed a mildly disconcerting shade of bubblegum. I’m looking for something to replace it.

Pinterest via Vivaterra
Pinterest

I’m looking for something a little bit granny, a little bit chic, and a lot of fun, all without spending a billion dollars.

I learned long ago that I don’t do well with large creative endeavors. If it can’t be completed in one sitting I can guarantee that it will be added to my list of unfinished projects. For that reason I’m hesitant to attempt sewing or stitching something of my own. The challenge in purchasing a quilt is that A) they’re expensive, and B) I’m kind of picky about it. The coverlet pictured above from VivaTerra is almost completely perfect except for the abundance of red. I am so not into red, and at $250 that thing had better be everything I ever hoped for. The crocheted blanket in the second picture is awesome, but it’s not for sale and even if it were I don’t know about the long term viability of cat claws + knitted blanket.

So here are my parameters for the dream quilt:

  • Twin size or larger. It’s gotta be about six feet long to cover the back of the couch
  • Extremely simple and inexpensive to craft myself OR under $250 retail (preferably much less)
  • Durable and machine washable
  • Hopefully incorporating shades of cream, blue, green, pink, and purple. My faves. Yellow and orange are okay. Red is tolerable only in small doses.

Does the perfect blanket exist?

DIY Rorschach Art

One of my favorite blogs, Little Green Notebook, posted a few months ago about using those psychobabble inkblots (technically called the Rorschach Test) as inspiration for art. I thought it would be pretty simple to pull off and a subtle nod to my work in mental health (although I’m more likely to be caught sorting out family drama and teenage angst than administering fancy tests).

DIY Rorschach Art by Hannah via Little Green Notebook

I decided to use leftover blue paint that I mixed up for the chevron pillow, and some greige-ish barkcloth that my friend Cassie gave me for the background. I took an 11×14 canvas and roughly measured out a fabric rectangle that would wrap around the edges enough to staple in the back. I had lots of fabric so I cut three rectangles, leaving me plenty of room for error and experimentation.

I practiced first on paper, using a syringe (whose actual purpose is to give the cats their flea medicine) to drip paint onto half of the page, and then folding the page in half to create a mostly-symmetrical blot.

I experimented with a few different techniques, but after the fourth one (pictured on the upper right), I felt I was ready to take it to the next level.

I didn’t do a good job of taking process pictures, mostly because it was kind of nervewracking getting the paint on there and then folding it in half carefully and pressing it together, then pulling the sides apart to reveal my masterpiece learning experience.

The fabric reacted to the paint a bit differently than the paper. The blot pictured above was my third and final attempt. Here’s the three all rounded up:

The middle one was created using the syringe technique, which definitely did not get enough paint on the fabric to achieve the look I was going for. When I made attempt numero dos (all the way to the right), I just dribbled the paint straight from the jar. Better, but still not extremely awesome. Finally, for my third attempt, I broke out a paintbrush and just started painting random dabs and streaks. While it doesn’t look anything like how I’d imagined, I kind of dig it. It reminds me of a fleur de lis, which is pretty much a staple of home decor in this part of the country.

To finish this project up, I waited a day for the paint to dry then laid the fabric face-down and centered my 11×14 canvas over the back, then worked around the edges from the center out, pulling taut and stapling as I went.

I decided not to trim the extra fabric in case I want to take it off the canvas and use it in some other way in the future. For now it’s living the good life on the mantle/ledge I whipped up last week.

I likes it. And this project cost me exactly zero point zero zero dollars because I had all the supplies on hand (I like to pick up canvases in various sizes when I see them on sale at Hobby Lobby because I know I can use them for little projects like this). I saved the best paper practice inkblot, as well, and I think I may stick it in a frame and put it somewhere else in the house. Except it might be weird to have two pieces of inkblot art with the exact same blue paint….maybe I should put it somewhere really far away and hope no one notices.

DIY Reclaimed Wood Shelf

A few months ago Nick and I were walking in our neighborhood and happened upon a neighbor who had put a pile of old, cypress tongue and groove floorboards on the curb, free to anyone interested. I picked the sturdiest looking one and figured I’d find something cool to do with it. Nick thought I was crazy, but dutifully carried it for the rest of our walk.

Months later, I was still waiting for inspiration to strike when I saw this…

Industrial Chic Reclaimed Wood Shelves | ana-white.com

The lovely Ana White, always inspirational, has outdone herself this time with an idea so simple even I can do it.

Since my board is only about three inches wide, I decided to use 2″ corner brackets. A pack of four (with screws included) cost me $4.68 at Home Depot. I’ve been lamenting my lack of a studfinder for ages so I picked one of those up as well for about $15.

Here’s the area where my new shelf was destined to live. I’ve been wanting to replace the small white shelf with something a little more proportional to the wall for months. The five foot long floorboard is perfect.

I marked the location of studs in my wall using my new studfinder and a pencil (p.s. studfinder is not as easy to use as I expected). Next, I sanded any rough or splintered spots on the old board and wiped it down, then used painters tape to mark where the brackets should be attached. I wanted the board to be centered on the wall and for the brackets to be equally distanced from the center, so I knew I probably wouldn’t be able to put both brackets into studs. I settled for just one, and based the spacing of my brackets on that measurement.

I held the brackets up against my board and marked where the screws should go, then pre-drilled the holes at an angle (it seemed like the right thing to do so I could attach a bracket on both top and bottom without the screws running into each other.

So far, everything was going great. I was feeling like a DIY goddess.

I marked where the screws needed to go on the wall, pre-drilled my holes, and hung my new awesome shelf up to admire…

Uh-oh, spaghettio.

Oh snap I majorly miscalculated on that one. Can you see what’s wrong? The bottom brackets are like an inch away from the wall. I’m not gonna lie, I was pretty annoyed. I walked away for a few minutes and when I came back, it didn’t seem like such a big deal. I just removed the bottom brackets from the board and screwed them in flush with the wall. I decided not to drill them into the board again for fear that I’d split the wood with so many holes so close together. So the board merely rests on the two bottom brackets and is attached with screws to the two top brackets. Note to self not to put any heavy books up there.

I styled it with the same items as the old shelf, only more spread out, and added an 11×14 canvas that I’m planning to adorn somehow, as well as an adorable silver pear I got at Z Gallerie last weekend ($6!)

I can. not. wait. to reupholster those wing chairs.

This was all done right after work on Friday, so I spent the rest of the weekend admiring it and figuring out what to do with that canvas. Can you believe that I went to two estate sales and a flea market on Saturday and didn’t buy a thing? I was shocked. I had some pretty specific things that I was looking for and didn’t find them and didn’t see anything else that absolutely had to come home with me. That’s pretty much unheard of for me because I have a hard time walking away from anything I even moderately love. I think I must be getting picky in my old age.